Tag: digital learning tools

  • “Tasty”-style Lab Videos: what, why and how to make fast-paced, engaging videos

    “Tasty”-style Lab Videos: what, why and how to make fast-paced, engaging videos

    Cathy Collett from the School of Chemicals, Materials and Biological Engineering at the University of Sheffield gives an overview of a novel style of lab video.

    What is a Tasty-style Lab Video?

    For the last couple of years, I have been experimenting with making lab videos in the style of recipe videos. The kind that auto-plays on your social media feed as you scroll down. You can watch an example for Apple Pie here.

    This video style has been referred to elsewhere as the “Tasty” style, and there are a few aspects that appeal to me:

    • you could get an overview of how to make a recipe in just one or two minutes
    • you can watch without requiring audio (e.g. on the train without having to get your headphones out, or turn your music off)
    • the high-speed presentation is informative and engaging
    • the overhead first-person perspective better represents what you would actually see if following the recipe

    I wondered if this could be an effective way of demonstrating experimental techniques to engineering students. There is plenty of research on the pros and cons of shorter videos, and the benefits of first-person perspective videos (“point-of-view”). I hadn’t considered omitting the narration before. From Mayers’ multimedia learning theory, I’d assumed narration would be beneficial, as the brain can process both visual and auditory stimuli in parallel. However, a meta-analysis by Adesope and Nesbit found that there was little benefit to spoken-written presentations compared to written-only presentations – a concept they termed “verbal redundancy”. I haven’t seen any research on the use of this video style to support laboratory teaching in Higher Education, so I decided to give it a go!

    Why make a Tasty-style Lab Video?

    So far I’ve piloted this video style with three different cohorts of engineering students:

    • Foundation Year Chemistry module (CPE007). After all, experimental procedures in chemistry can often feel like following a ‘recipe’ – add a few ml of this, a few grams of that, heat it up and see what happens. (Although we strongly advise against eating the product afterwards.) You can watch an example for Ion Exchange here.
    • Masters level Applied Energy Engineering (CPE6311). The Clean Energy experiment involves testing four different pieces of equipment: a solar panel, a wind turbine, a hydrogen electrolyser and a hydrogen fuel cell. The students on this course are primarily international students with English as an additional language, so I was interested to see if they found the videos useful. You can watch an example video for Electrolysis here.
    • First year Danger Lab. This is an induction lab taken by all first year Engineering students at Sheffield. Students compare the energy needed to break a piece of chocolate at room temperature and liquid nitrogen temperature. We asked students for feedback via an anonymous survey. You can watch the 1-minute Danger Lab video here. A screenshot is shown below.
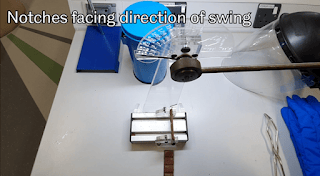
    Tasty style video screen shot

    Being an engineer, naturally I wanted to assess the effectiveness of the videos using numbers! For CPE007, after changing to a Tasty-style video, we found the percentage of the class viewing the video increased from 32% to 52%. For CPE6311 videos we found the percentage of the class viewing remained high, although it did drop slightly from 78% to 73%. In both cases, the percentage of students watching the videos to the end increased, indicating that students found the videos engaging.
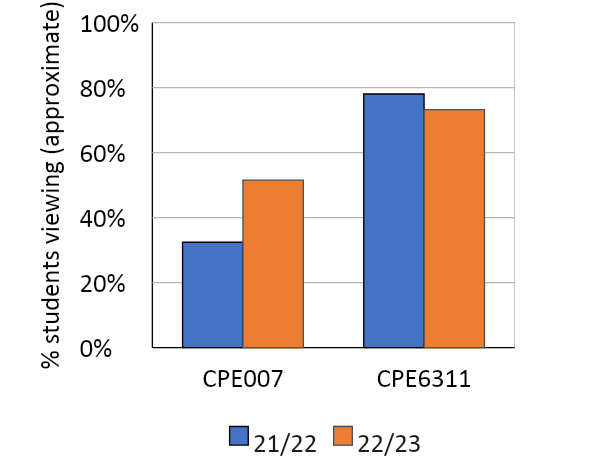
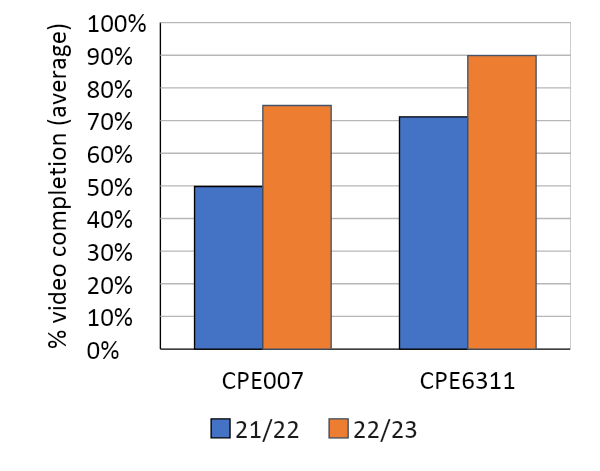
    image of a graph 1
    image of a graph 2

    For Danger Lab, we found that more students watched the 1-minute video compared to a traditional 5-minute video (574 vs 510 unique viewers), and more watched it to the end (91% vs 65% completion), again indicating that students found the video engaging. The feedback from first year engineers was very positive. Comments included “I liked it a lot, very convenient”, “I liked the short time format because it made the video easily digestible” and “I liked the videos that accompanied each instruction.” No students commented that the video was too fast or difficult to follow, and no student requested narration to improve the video. The main area for improvement was requests for more detail (e.g. zooming in on the liquid nitrogen tank or showing how to set the initial impact energy).

    How to make a Tasty-style Lab Video?

    I started off using a digital camcorder and tripod to film these experiments, however the tripod was difficult to work around. I now use an overhead mobile phone clamp, available from the Creative Media Team, and an LED light stick to improve the lighting of the videos.

    Example of an overhead arm clamp for a mobile phone, used to achieve the first-person perspective for Tasty-style videos

    Whilst recording, I realised an additional advantage of this style of video: it didn’t matter what else was going on in the lab at the time! As I wasn’t using the audio, it didn’t matter what conversations, crashes or explosions were going on in the background.

    As long as I had a corner where I could get on with an experiment, I could keep the camera focused on the experiment and it wouldn’t be filming anyone else in the lab. This meant it was logistically much easier to get the videos filmed.

    The main barrier I anticipate staff will have to trying this video style is the time taken to learn how to do the editing. I used Adobe Premiere Pro for the first time in this project, learning from videos from Sheffield’s Creative Media team. It did take me a full working day (and a lot of banging my head against the desk) to get it installed and work out how to do the basic functions like zooming, speeding up and adding captions. However, now that I’ve got the hang of it, I find the editing reasonably straight forward. As it is all one camera angle with no narration, it takes me about 1-2 hours to produce a 1-minute video.

    What next?

    If you’d like to trial this video style in your own labs, whether at Sheffield or elsewhere, please do get in touch with me (Cathy Collett, c.h.collett@sheffield.ac.uk) – I’d love to know how it goes! You can also check out our Google Site where we’ll be adding resources, guidance and case studies.

    When citing this work, please use the following citation:
    Collett, C (2024). “
    “Tasty”-style Lab Videos: what, why and how to make fast-paced, engaging videos” Centre for Engineering Education Blog, The University of Sheffield, Sheffield, UK. June 2024. https://ceesheffield.co.uk/2026/10/29/tasty-style-lab-videos-what-why-and-how-to-make-fast-paced-engaging-videos/
  • Adding Depth to Engineering Education

    Andrew Garrard from Multidisciplinary Engineering Education explores the role of 3D visualisation in engineering education and asks when it offers a genuine advantage over traditional 2D diagrams. Drawing on examples from practical teaching, including virtual lab tours, wind turbines and fluid mechanics, Andrew considers how 3D technologies can help students understand scale, spatial relationships and physical phenomena, while questioning whether their use always adds educational value.

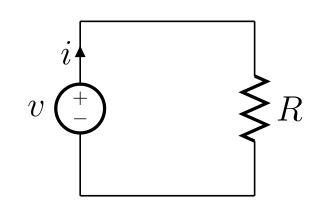
    Teaching engineering often involves using pictures. These pictures could depict the mechanics of some physical phenomena with a sketch, describe the relationship between different parameters with a graph or illustrate the interactions between components of a complex system with a diagram. If you imagine how you would explain any of the classic concepts of engineering science, things like bending moments in a beam, the development of a fluid boundary layer or the voltage and current in an electrical circuit, you will most likely include sketching schematic pictures to represent these systems as part of the process.

    Diagram

    Two dimensional representations are ubiquitous in the communications between engineers. Yet the world in which engineers apply their craft is, more often than not, three dimensional. So why is it that 2D drawings are so much more widely used to convey engineering concepts than 3D ones?

    For a long time the tools available to the engineering educator, such as notebooks, printouts, drawing boards and whiteboards, have been limited to flat surfaces. Common devices used for digital methods of communication, such as monitors, mobile phones and projectors are also mostly flat surfaces. But that isn’t necessarily going to remain the case and there are indications that 3D could become the new standard in how ideas are communicated.  Engineering educators need to pay attention to this.

    Firstly, although most digital devices have a flat surface to display their content, they have the advantage of being able to represent 3D objects by dynamically orienting the projection of the 3D object onto the 2D screen.  It is only recently that computing hardware has become powerful enough and software has been efficient enough to make the creation and manipulation of 3D content widely accessible. TinkerCAD offers the creation of 3D objects with nothing more than access to a web browser and passing 3D content between different systems is now almost a turnkey process.

    Secondly, students are much more likely to consume their content through a digital device rather than anything paper based, giving wider access to the potential to display 3D objects. This has been a clear trend for a number of years now, but the Covid-19 pandemic has cemented the superiority of the digital display of teaching material compared to the printed page.

    Finally, the potential future utilisation of virtual and augmented reality for all manner of common tasks cannot be ignored. While in its infancy, especially for teaching, the plummeting cost of VR hardware coupled with the noticeable investment being made by the large tech giants is an indication that this technology could become a mainstream component of how people interact.

    The limitations of traditional tools to articulate visual concepts have influenced our methods for communicating, such that the use of 2D visualisation is completely ingrained in our professional lives. I was taught engineering using 2D, so my mind thinks about explaining things using 2D and so the cycle continues. But as we are now all acutely aware, disruptive technologies can change traditional industries rapidly, and those that don’t pay attention get left behind.

    As with implementing any new technology, there is a cost in developing the skills required utilise the tools. To justify that investment of resources, there has to be a clear benefit. In many cases, the presentation of information in 2D will be preferable to 3D visualisation, as 2D schematics can be used to make complex systems straightforward to understand without the burden of having to manipulate the image to look around it. There are plenty of examples of the arguably unnecessary use of 3D to convey information where 2D would have worked equally well.

    In the Fluids Engineering lab, we were very excited to create and share with students, in advance of their experiments, a digital 3D version of our teaching wind tunnels. This allowed them to rotate around and zoom in and out of the equipment. The idea was to provide an introduction to the apparatus so students could prepare for the lab class. The tool is very impressive. However, the ability to rotate around the equipment and zoom into and out of the 3D object isn’t enormously helpful, as students using the real equipment will typically stand in front of the fixed equipment and do not experience the other viewpoints.  Manipulating the 3D object on the screen is quite fun, and there is an advantage in making an activity more engaging even if the extent of the communication of content isn’t enhanced. But if that is the justification, we should be conscious of this rather than kidding ourselves that we are adding any substantial value to the learning.

    As I am particularly interested in practical engineering education, I’m aware of the increased use of 3D photography and videos to provide virtual lab tours. Just type “360 lab tour” into google and you will find a plethora of examples.

    Wind Tunnel

    But is there any educational value in providing students a tour of the lab in advance of their arrival? There is definitely a marketing opportunity to show off impressive facilities and the possibility of students being less anxious about entering an unfamiliar environment. But I question if there is much learning from knowing the relative positions of the furniture or pieces of equipment in 3D that couldn’t be achieved through simpler means, like a map. Or signs. When students come into my Fluids Engineering lab, they can usually find the piece of equipment they are looking for after a quick scan around the room, because they are aware of what it looks like from a 2D photograph they have been provided with in advance.

    I’m constantly on the lookout for examples of where using 3D has a distinct advantage over other approaches. So far I have two, which I will offer here, but I’m keen to hear if people have others.

    To convey a sense of scale

    Engineers can work on some pretty big stuff. I can remember being taken to Drax Power Station as part of my undergraduate studies and being awed by the size of the various fans and pipes and other massive engineering things. When I led the programme for Energy Engineering I would always take my students to a wind farm. While you can explain that large turbines have 100 meter blades spinning at 150 miles an hour, to really sense what it feels like you need to stand underneath one. If you have never done it, I’d highly recommend it.

    Andrew Garrard in front of two wind turbines

    Obtaining a similar experience of scale and awe can be achieved using VR headsets. The sensation of being physically present isn’t quite the same, but the accessibility is unrivalled.

    Taking large groups of students on field trips is expensive and an organisational nightmare. Even relatively local sites will be a challenge to find the time to accommodate. But with a £300 headset students could travel to a range of different engineering facilities across the planet and once the content is created, the scalability is virtually unlimited.

    When 2D schematics do not represent 3D objects

    One of the more enthusiastically received experiments we do in the Fluids Engineering lab is the generation of smoke rigs. We can make small ones with custom built smoke ring generators, or giant ones with a plastic dustbin into which I cut hole in the bottom.  There is something mesmerising about watching the smoke gently precess down the length of the lab, holding together with stability afforded by the vortex.

    I ask students if they had ever seen anything like it before during their studies of fluid mechanics and I am surprised with how frequently the answer is that they have not.

    Andrew Garrard creating a large smoke ring

    I am surprised because they definitely have, as similar structures appear as “recirculation zones” in the step where pipes expand from a smaller to larger diameter – a reasonably classic piece of fluid mechanics that all students do learn about. But after some further questioning, it occurred to me that the lack of recognition is caused by the overwhelmingly common presentation of this structure in 2D. It had compromised their understanding of the actual physical manifestation of the system.

    Flow diagram

    Shown above is a slice through a circular pipe. The recirculation zones are the ovals and this is pretty much universally how they are depicted in all explanatory teaching material. But it is just a slice to allow it to be shown in 2D. In the real, 3D pipe this 2D cross section is rotated around the axis and the recirculation zones take on the shape of a doughnut, which an Engineering would call a “torus” because we are cool, and is almost identical to the structure seen in a smoke ring.

    I created the 2D water flowing form a smaller to larger diameter pipe schematic shown above in 2010 using open source vector graphics tool Inkscape. I chose 2D because this is the way I had been taught about recirculation zones and because building 3D content was prohibitively out of my expertise. However, if I were to prepare this teaching material in 2022, I would consider doing it in 3D using easily accessible, simply to use and free tools. In about 60 seconds and with nothing more than a web browser, I can create a torus in TinkerCAD, download the .STL and upload it to Sketchfab to embed within a webpage.

    When citing this work, please use the following citation:
    Garrard, A (2022). “
    Adding depth to engineering education” Centre for Engineering Education Blog, The University of Sheffield, Sheffield, UK. February 2022. https://ceesheffield.co.uk/2026/10/29/adding-depth-to-engineering-education/

  • Reusable Teaching Blocks

    Reusable Teaching Blocks

    Colour square crayons

    Andrew Garrard from Multidisciplinary Engineering Education explores the idea of reusable teaching blocks: self-contained digital resources for teaching fundamental engineering concepts that can be shared across disciplines and courses. He considers how this approach could make teaching more efficient, support flipped learning and free up time for practical, problem-based activities. Andrew also outlines a proposed framework for developing these resources collaboratively and invites other engineering educators to help take the idea forward.

    This blog post is, in equal parts, personal musings, an idea and a call to arms. Reusable teaching blocks are an idea that could be very powerful?

    The department of Multidisciplinary Engineering Education is charged with a singular mission: to make the delivery of practical teaching efficient through scale. We identify the content and resources that can be shared by more than one engineering discipline and, when there is broad appeal, it justifies investing a significant amount of effort in developing a high quality, reusable resource.  Chemical, Aerospace and Civil engineers may apply their knowledge to different contexts, but they all require a fundamental understanding of, for example, fluid mechanics. Once we have developed a scalable fluid mechanics lab activity for one degree programme, it is really easy to offer it another with a few tweaks to account for a particular context.

    Because our activities are designed to be implemented using equipment in our laboratories, the extent to which they can be shared is limited by the geographical proximity of our students. Additionally, the equipment requires maintenance, space and physical infrastructure, all of which makes it difficult to replicate the teaching we deliver outside the University of Sheffield. But what if we could replicate the model of sharing teaching resources with the didactic teaching of theoretical engineering concepts rather than practical ones?

    We propose the idea of discrete, reusable teaching blocks, which are stand alone (or with a small amount of defined pre-requisite knowledge) digital, scalable objects that are used to deliver compartmentalised theoretical content. We feel that the time for this idea is now. After the covid-19 pandemic engineering educators have been kickstarted into developing lots of online resources, and gained experience, confidence and competence in doing so they may not have had before.  The sector has had an opportunity to test en-masse what works well and what doesn’t. And students have been forced to embrace new ways of being served content and have identified what aspects they find valuable and appropriate to be delivered in this way.

    The zeitgeist in engineering education is for learning through authentic or problem based approach. This is an excellent approach to engage students with real world applications and demonstrate the value of their knowledge, understanding and skills.  But it is important that we find mechanisms to actually teach the large amount of knowledge, understanding and skills that are required to engineer solutions to problems. Any tools used to make the teaching of engineering concepts more efficient, for both staff and students, allows more effort that can be expended on staff facilitating and students engaging with more open ended project type learning.

    Should all the teaching of didactic content be delivered online and with homogenous blocks of content? Of course not. Individual building blocks used in construction have no form in their own right. It takes the application of creativity and vision to assemble a collection of building blocks into a recognizable and coherent structure. And the same can be true for reusable teaching blocks. We can separate the functions of producing teaching material blocks and the function of selecting, arranging and contextualising them  If the job of producing the contents is done once, done well and used by many different courses, the intellectual effort of the educator, previously used to build the content, can be focused on the curation placed in the context of the disciple.

    The idea of reusable teaching blocks aligns perfectly with the method of flipped classrooms. When learning is flipped, didactic learning is delivered while staff are away from the students,allowing activities that are more valuable to be conducted during the face to face teaching.  Reusable teaching blocks could be used while the students are self-studying and the contact time is used to inspire and enrich the curriculum by articulating how the blocks relate to one another and using the content in the context of the specific disciple.

    CDIO is ostensibly a framework to codify teaching through problem based, design/build/test learning to allow quick deployment without the need to reinvent the wheel. Educators can dip into the framework and pull out the resources and teaching methodology to directly embed into their curricula. While problem based learning and design/build/test are engaging ways of demonstrating the application of engineering theory to real world problems, it can’t be used without students having basic engineering knowledge and understanding. I mean, it’s right there at the bottom of Bloom, indicating that you can’t do the application and analysis without the lower levels of the pyramid being first being there to rest on:

    What if a collaboration of like minded educators could get together to set up a framework with similar reach and value as CDIO, but for the reusable teaching blocks of didactic engineering concepts? Wouldn’t that be valuable for all engineering educators? We would be very interested in joining forces with anyone that could help make this idea come to life.

    The first step would be to define a framework. Here is my starter for ten:

    In the metaphor, the type of blocks we are imagining about are more like wooden building blocks than lego (other variously coloured interlocking plastic bricks are available).  Lego blocks have a pre-defined orientation and limited ways in which they can interconnect. Reusable teaching blocks should be more like wood teaching blocks that can be oriented and arranged to build any conceivable structure. The concepts are the blocks, the educator is the architect designing the structure and the disciple context is the glue that holds the blocks together in the chosen form. To allow facilitate this, reusable blocks should ensure:

    • They are stand alone or with as little prerequisite knowledge as possible.
    • Where prerequisite knowledge is unavoidable, blocks should be clearly signposted (preferably to other reusable teaching blocks). However complex learning environments can be created by stacking a number of blocks into ‘Elements’. These can be reused in part or whole as needed.
    • They are atomistics: blocks should aim to introduce as few concepts as possible
    • Specific applications or examples of concepts should be separated from the description of the concept. Context and examples can be created as additional blocks to form part of the menu.
    • Terminology or nomenclature should be fully explained to ensure it is stand alone.
    • They are free of decorative clutter, subject or context information or corporate branding.
    • They may have associated micro assessments to ensure engagement.

    When citing this work, please use the following citation:
    Garrard, A (2021). “
    Reusable Teaching Blocks” Centre for Engineering Education Blog, The University of Sheffield, Sheffield, UK. September 2021. https://ceesheffield.co.uk/2026/10/29/reusable-teaching-blocks/